- Basic Checklist for installing Storm Panels
- Is there any way to speed up deploying storm panels?
- How to Install Lead Machine Screw Anchors in Block and Concrete
- Why do the heads of the Sidewalk Bolts sometimes stripout?
- Can the Sidewalk bolts be painted and will it peel off?
- My question is how to best lubricate the sidewalk bolts so that they remain easily removeable? Lithim grease, for instance, doesn't last in a hot Caribbean climate.
- With PanelMates why should I use the longer 1 1/8" stud for plywood?
- Why should I use a PanelMate instead of a hanger bolt?
- Can I paint the white plastic caps?
- What is a Stalgard® Finish?
- How do I find the correct anchor location in wood framing?
- How do I determine the correct length of a PanelMate fastener?
- How to install lead anchors?
- What is Embedment?
- What is Edge Distance?
Installation Tips:
Checklist for installing Storm Panels
- Decide what panel you are going to be using to protect your home
- Check with the local municipality or your insurance company prior to start
- Determine whether your home is frame or masonry construction
- Choose the correct fastener style, length, male/female, finish, etc.
- Confirm the proper edge distance and embedment of the fastener
- Gather the correct tools for your application
- Stop and think - try a small window - come up with a system
- Most openings are repetitive use a layout stick
- Always use safety gear including eye and hearing protection
- Label panels by opening or number and safely, securely store panels
Is there any way to speed up deploying storm panels?
The biggest factor outside of being prepared with shutters is to have available labor to help. Many times it is not the actual shutter installation that takes the most time. Often it is where the shutters are stored; it may take as long to bring the panels from the garage or shed to the window as it does to actually install the shutters at that window or door. Consider keeping a nail apron, extra gloves, and a Power Wingnut Driver for your cordless drill as part of your installation kit.
Lead Anchors:
Installation of Lead Machine Screw Anchors in Block and Concrete
- Carefully mark all holes in the correct location. Based on panel or plywood layout.
- Drill a ½” hole to the required depth using a ½” Combo Drill bit with pilot tip.
- Using safety glasses and a turkey baster blow out any excess dust from the hole.
- Insert the anchor with the brass skirt or lead skirt end going into the masonry opening first.
- Use a manual or power setting tool to “set” the anchor in the hole. The setting tool expands or deforms a portion of the lead anchor locking it into the hole. A manual setting tooluses a hammer as the force to set the anchor. A power setting tool makes use of a cordless drill.
- The threaded portion is then ready to receive the 1/4" Combo Sidewalk Bolt.
- Leave sidewalk bolts or nylon screws in the anchor when not in use to keep the threads free of dirt and debris.
Sidewalk Bolts:
Why do the heads of the Sidewalk Bolts sometimes stripout?
While the most common screwdriver in the home is a #2 Phillips; the head of the sidewalk bolt is actually a #3 Phillips. Making the change to the larger #3 Phillips tip should eliminate the striping out of the center of the screw.
Can the Sidewalk bolts be painted and will it peel off?
Yes and Maybe..
We have seen many methods tried thruout the years. Some with a tremendous amount of preparation and others with none at all. In most cases with modern acrylic house paint applied right over the fastener appears to last about as long as the house surface itself. The most important thing to remember is to remove the Sidewalk bolts completely for painting or back them away from the house, paint, and let dry sufficiently. Painting over in place will hinder hurricane panel installation when the time comes, and risk paint peeling on the house in the area around the Sidewalk bolt. If replacements are needed check the length, a 1" combo sidewalk bolt is the most commonly found.
My question is how to best lubricate the sidewalk bolts so that they remain easily removeable? Lithim grease, for instance, doesn't last in a hot Caribbean climate.
Most manufactures will recommend in this application use of a non-silconized lubricant in a spray. The non-silconized will not attract dirt like a WD-40 or white lithium grease. Remember the head on the sidewalk bolt is a #3 Phillips.
PanelMates:
With Male PanelMates why should I use the longer 1 1/8" stud for plywood?
The most common ELCO PanelMate Pro anchors come with a choice of a 7/8" or 1 1/8" stud where the storm panel or plywood shutter is placed over. Once the panel is in location a washered wingnut goes over the stud to hold the panel in place. The 7/8" stud length will work with most fabric, steel, or aluminum storm panels. The 7/8" stud will also accommodate some of the thinner plywood shutters in the "first season". The 1 1/8" stud is designed for the thicker plywood shutters and some of the fabric systems with the larger clips. ---Remember:-- Even with proper dry storage plywood shutters have a tendency to curl and warp.There is nothing more frustrating when a storm is coming after having taken the time to properly make and install shutters. Only to have to push and lean on the plywood just to get the "seasoned" plywood down over the stud. Choose the longer 1 1/8" studs from the start!!
Why should I use a PanelMate instead of a hanger bolt?
There are several key advantages to using the ELCO PanelMate. The PanelMate can be used in Wood or Masonry applications where the Hanger Bolt is just for wood only. Hanger Bolts require time consuming “double nutting” every time you place an anchor where the PanelMates have a built in hex drive system for faster cleaner sets. PanelMates have a built in ring stop at the exact depth required for a perfect set and correct embedment. Additionally in a permitted application most panel manufactures call for an approved and tested fasteners for their systems of which the ELCO PanelMate is most often listed and specified.
Can I paint the white plastic caps?
Yes, The white caps can be painted to match your house color. Make sure you do not paint the caps "to" the house. Typically the paint will flake off in 4-5 years at which time they can be repainted. We also have the new bronze caps available to keep everything maintenance free. Additional colors coming soon.
What is a Stalgard® Finish?
Silver Stalgard® is an entirely chrome-free multi-step coating process that combines an inorganic zinc-rich basecoat with an aluminum-pigmented organic topcoat. The basecoat provides sacrificial protection of the steel substrate while the thermosetting topcoat creates a durable barrier. This duplex process offers advantages of both sacrificial and barrier corrosion protection to provide exceptional corrosion resistance.
Wood Framing:
How do I find the correct anchor location in wood framing?
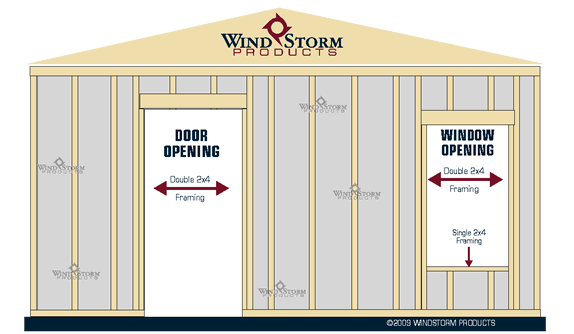
One of the most difficult framing systems to anchor to is wood framing. The reason is that wood framing is only found right at the opening and can be rather narrow, for this reason you need to be sure where the framing is located to insure your anchors penetrate the framing correctly, This requires a certain precision especially when the exterior finish is brick veneer or stucco with decorative bands. Oneway to determine the framing location is to use a stud finder from the inside to locate the vertical and horizontal members.
The diagram below shows how a wood framed structure is typically framed. In this framing diagram there are generally only (two) 2x4's on each side of a door or window opening. The top has a large header which is fairly easy to hit, but under the window there is often only one 2x4. The preference for most shutter systems is to attach side-to-side since the vertical 2x4's are easier to find and penetrate.
A difficulty often encountered is that many shutter systems like some clear sheet products, and certain accordions shutters they may require attachment on all four sides. Make sure to plan for Brick sills, foam bands, or wood sills, that often block access to proper fastener placement.
The variety of decorative finishes and brick designs being used today means storm panel anchors must be long enough to pass through the finish, wood sheathing, and must penetrate the structural framing with the required embedment depth (a recommend 2+inches minimum embedment into the wood frame is typical).
Typical wood framing components:

How do I determine the correct length of a PanelMate fastener?
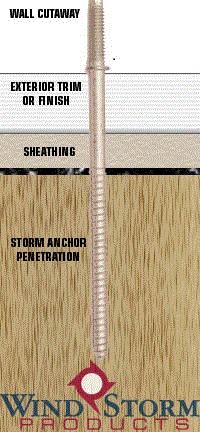
 The picture at left is a cutaway of a wall; you can see the finish, the sheathing, and the framing. Determining the proper length means you add the finish thickness to the sheathing thickness and then add the required embedment.
(embedment is the length or amount of the fastener actually penetrating into the structural wall stud or concrete block)
Example: Brick veneer is generally about 3-1/2 inches thick and has a 1 inch air space behind it so, if the embedment depth from the Anchor Chart in the engineering calls for 2 inches, the formula is: 3-1/2" brick + 1" air space + 1/2" sheathing + 2" embedment = 7 inch minimum. If you are using a male PanelMate system like the illustration then look to the ELCO PanelMate Pro TVAS.
Masonry Construction:
Above all start with confirming your layout. Masonry is very unforgiving when trying to move or re-drill a hole. A hammer drill, and safety gear(safety glasses, hearing protection and gloves) are always a must. Depending upon the size of the home and the number of windows the average home will need anywhere between 100 and 200 lead anchors drilled and set. Which again makes proper layout and the right tools a key to success.
Confirm the proper depth required for the lead anchor. Look for a combo bit if available. The Combo bits have a smaller pilot bit to help start the hole in the correct location and then "steps up" to the larger diameter needed to drill the hole. After the hole has been drilled to the proper depth clean the hole with a turkey baster to remove any dust from the hole. Leaving the drill dust in the hole without cleaning will keep the anchor from the proper set. Place the anchor in the hole in the correct direction. If you are not used to setting anchors it is easy to start putting them in backwards making it very hard to remove and reset.
What is Embedment?
Embedment is the length or amount of the fastener actually penetrating into the structural wall stud or concrete block wall. Code Approved shutters usually require that the fastener be a certain depth into the structural stud or wall surface.
What is Edge Distance?
Edge distance is another requirement with Code Approved shutter systems. The edge distance on 2X wood framing is the center of the 2X or 3/4". Often the edge distance on masonry wall is 2 1/2" minimum. Which means the fastener must be placed at least 2 1/2" (not including stucco) from the edge or corner of the window. All systems are different always check your engineering or with the local municipality.
